Wprowadzenie do diaspory*
Część 2 - Interfejs
Note: if you are using a laptop or desktop computer, you will be viewing the diaspora* interface designed for larger screens. Click here for a guide to the desktop interface.
You’re now looking at an interface that might be unfamiliar to you. (If you’re still on the edit profile page, click the pod name or Stream at the left-hand end of the black header bar.) Let’s have a quick look at the layout and start to get familiar with it.
Because of the decentralized and open-source nature of diaspora*, it is possible for pod administrators to customize their pods. Therefore, depending on which pod you’re on, the interface might look very slightly different to how it’s described here. However, the essential elements should all be present, even if they are arranged slightly differently.
At the top of the screen is the header bar, which always remains in place, even when you scroll down the page. This header bar contains:

- an asterisk icon, which takes you back to the stream page;
- a notifications icon (we’ll cover this in Część 6);
- a conversations icon (also covered in Część 6);
- an icon to create a new post;
- an icon to open the “drawer” containing further options.
Tapping the “drawer” icon (three horizontal lines) opens the navigation menu, which contains:
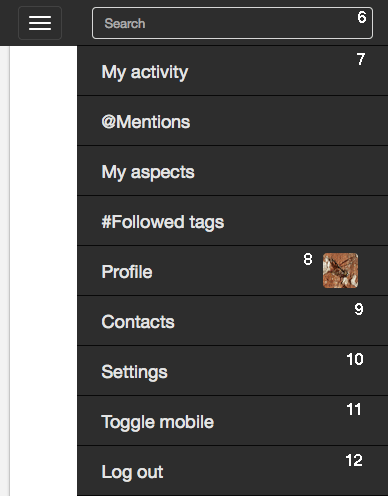
- the search bar (more about this in Część 4);
- links to your My activity, @Mentions, My aspects and #Followed tags streams (see below);
- a link to your profile page (see below);
- a link to your contacts list (see Część 4);
- a link to your account settings page (see Część 7);
- a link to toggle between mobile and desktop interfaces;
- a log out button.
Beneath the header is the main content stream.
Różne widoki dostępne w diasporze* to:
Strumień
The “stream” is your home page in diaspora*. It aggregates all the posts available to you. That is:
- posts made by your contacts;
- public posts made containing #tags you follow;
- posts that @mention you;
- posts from the “Community spotlight,” if your pod has enabled this feature (see Część 7).
Wpisy w strumieniu są posortowane według czasu oryginalnego wpisu.
Moja aktywność
Your “My activity” stream shows any posts which you have either liked or commented on. This is a useful way of catching up on any interactions you’ve been having in diaspora*. Posts in this stream are ordered according to the latest activity (comment or like) on each post.
@Wzmianki
Te listy wpisów utworzonych przez inne osoby @wspominające o Tobie. Przedyskutujemy wzmianki w Część 4.
Moje aspekty
“My aspects” displays all posts made by all the people with whom you are sharing – that is, the people you have placed into your aspects. Don’t worry if you don’t know what an aspect is – we’re going to cover this in detail in the next part.
Click on My aspects in the menu to see the list of your aspects. You can view posts made to all aspects, or just to one or more individual aspects, by selecting and deselecting them from the aspect list in the menu.
#Obserwowane tagi
This view displays all available posts (public posts and limited posts made to aspects you have been placed in) containing tags you follow. We’ll look at tags in more detail in Część 5.
In this view you will see a list of your tags. Clicking on a tag in the sidebar will take you to the stream for that tag. You can stop following a tag by clicking the cross by its name in the sidebar.
Public activity
The public activity stream displays all public posts available to your pod, even posts created by people you aren’t sharing with and which don’t contain any tags you follow. That’s a lot of content!
Other views
There are other views available in diaspora*, which you can find by clicking links.
Tag stream
Click on any #tag in diaspora* to take you to the “tag stream.” This shows you a stream containing all the posts your pod knows about which use that #tag.
Single-post view
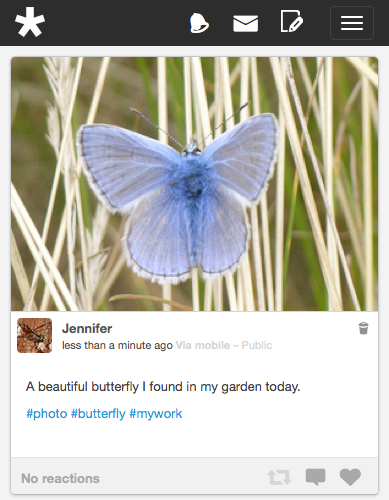
Click on the timestamp on any post to view that post and any comments on it in the “single-post view.” The timestamp is the link by the post author’s name that reads something like “2 hours ago.” If you want to send someone a link to a post in diaspora*, you can grab the post’s direct URL from here.
Widok profilu
Clicking your name or profile image (your “avatar”) anywhere you see it takes you to your profile page. This shows you all the posts you have made in diaspora*. It also displays your profile photo, screen name, “about me” tags and your “diaspora* ID (which looks like an email address, starting with the user name you chose followed by the name of your pod).
Click the Settings link in the drawer if you want to change any of your profile information.
You can also view someone else’s profile page by clicking their name or avatar. How much of a person’s profile information and posts are made available to you depends on the type of sharing relationship they have with you.
At the top right you’ll find an aspects button. If the person is not in one of your aspects, it will read “Add contact;” if they are, it will be green and show the name of the aspect you’ve placed them in. Click it to add them to an aspect. If you are ignoring that person, the button will be red and will read “Stop ignoring.”
Color themes
You can customise how diaspora* looks by choosing one of our color themes from the Settings menu (see Część 7). The current themes are:
- Original gray: this is the default diaspora* theme
- Original white background: the default theme, but with a white background. This looks more like the “old-school” diaspora* interface
- Dark green
- Magenta
- Egyptian blue
Your pod might have created some custom themes. If so, they’ll show up in the list along with our default themes.
That’s all you need to know about the interface for now. The first thing you will want to do is finding some people to start sharing with. However, before we get to that, let’s focus on something that features prominently throughout diaspora*: aspects.
Note: the rest of this tutorial series shows screenshots from the desktop interface to illustrate the features in diaspora*. Some features are not yet available in the mobile interface. When this is the case, you’ll need to click Toggle mobile in the drawer in order to be able to use this feature. We’re sure you’ll be able to work out where the differences are – it’s not difficult!